Unleashing the Power of System Managed Identity for Azure SQL Database: A Step-by-Step Guide and Troubleshooting Tips

Login failed for user ‘<token-identified principal>’

Azure SQL Database provides a powerful feature called Managed Identity, which allows applications and services to authenticate and access resources securely without the need for explicit credentials. In this blog post, we will focus on System Managed Identity for Azure SQL Database. We will cover its benefits, common permission-related exceptions, and provide a practical example of connecting Azure Data Factory and Azure App Service using System Managed Identity. Additionally, we’ll demonstrate how to query the roles assigned to the managed identity.

Introduction to System and User Assigned Managed Identity

Azure offers two types of Managed Identity: System Managed Identity and User Assigned Managed Identity. System Managed Identity is automatically provisioned and managed by Azure for a specific Azure resource, such as an Azure SQL Database. On the other hand, User Assigned Managed Identity is created explicitly by the user and can be assigned to one or more Azure resources. Learn more about Managed Identity

System Assigned Managed Identity Provides Several Benefits

  • Simplified authentication: Eliminates the need to store and manage explicit credentials for Azure resources.
  • Secure access: Establishes a secure channel between the Azure resource and the target resource without exposing sensitive information.
  • Seamless integration: Allows applications and services to access other Azure resources, such as storage accounts or Key Vaults, with minimal configuration.

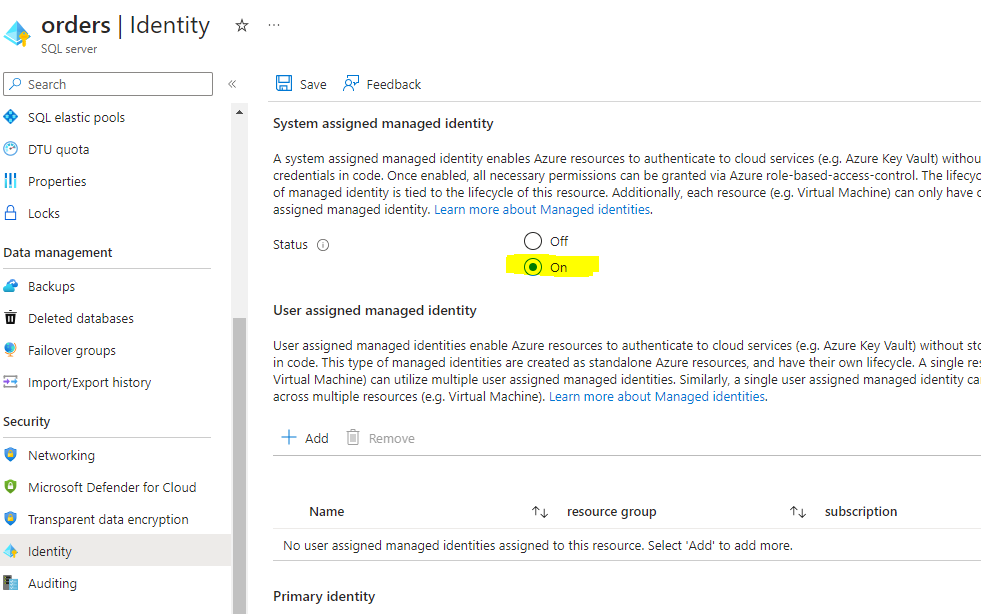
Enable the System Assigned Managed Identity

To enable the managed identity, you can use the Azure portal, Azure CLI, or Powershell.

Azure CLI

az sql server update --name <sql-server-name> --resource-group <resource-group-name> --assign-identity

Azure Portal

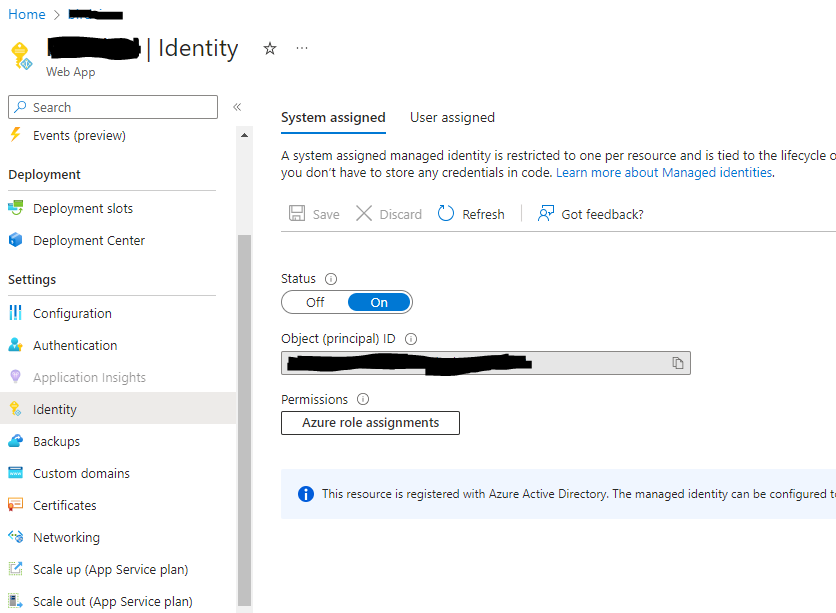
Enable System Assigned Managed Identity For App Service

To enable the managed identity, you can use the Azure portal, Azure CLI, or Powershell.

Azure CLI

az webapp identity assign --name <app-service-name> --resource-group <resource-group-name>

Azure Portal

Common Exceptions and Permission Requirements

The more common exception when working with managed identity
Microsoft.Data.SqlClient.SqlException (0x80131904): Login failed for user ‘<token-identified principal>’. Stackoverflow

When working with System Managed Identity, it’s crucial to understand the common exceptions that can occur when the appropriate permissions are not assigned to the managed identity. The most common permission-related exceptions include:

  • Login Permissions: Ensure that the managed identity has the necessary login permissions at the SQL Server or database level. Without these permissions, the managed identity won’t be able to establish a connection to the Azure SQL Database.
  • DDL (Data Definition Language) Permissions: If the managed identity lacks the necessary DDL permissions, it won’t be able to perform operations such as creating or modifying database schema objects.
  • Reader and Writer Permissions: Without proper reader or writer permissions, the managed identity may encounter issues when attempting to access or modify data in the Azure SQL Database.
  • Stored Procedure Execution Permissions: If the managed identity does not have execute permissions on stored procedures, it won’t be able to invoke them.

To avoid these exceptions, it’s essential to ensure that the managed identity is granted the appropriate permissions at the SQL Server or database level, as well as for specific operations within the Azure SQL Database.

Querying Roles Assigned to the Managed Identity

To check the roles assigned to the System Managed Identity in Azure SQL Database, you can use the following query

SELECT p.name AS PrincipalName, r.name AS RoleName
FROM sys.database_role_members m
JOIN sys.database_principals p ON m.member_principal_id = p.principal_id
JOIN sys.database_principals r ON m.role_principal_id = r.principal_id
WHERE p.name = '<app server name or adf name>'

Assign Appropriate Permission

Run the following command using SSMS or Azure Data Studio. You must connect to the database you want the system identity to access and have admin permissions to execute the following commands. A system identity is always Azure resource name, e.g., App Service Name or ADF name—additional reading for Create User command.

USE DatabaseName;
CREATE USER <App_Service_Name or Managed Identity Name> FROM EXTERNAL PROVIDER;

-- DB Reader
ALTER ROLE db_datareader ADD MEMBER <App_Service_Name or Managed Identity Name>;
--DB Writer
ALTER ROLE db_datawriter ADD MEMBER <App_Service_Name or Managed Identity Name>;

-- db_ddladmin [Not required]
ALTER ROLE db_ddladminADD MEMBER <App_Service_Name or Managed Identity Name>;

Limitations

System Assigned Managed identities in Azure have certain limitations that you should be aware of:

  1. One-to-one relationship: Each Azure resource can have only one system-managed identity associated with it. If you require multiple identities for different purposes, you may need to consider using user-assigned managed identities.
  2. Limited to Azure AD authentication: System-managed identities are designed for Azure AD authentication within the Azure ecosystem. They cannot be used for external authentication protocols like OAuth or OpenID Connect.
  3. Limited to Azure resources: System-managed identities are tied to specific Azure resources such as virtual machines, Azure Functions, or App Services. They cannot be used outside the scope of these resources.
  4. Limited to specific Azure services: While system-managed identities are available for a wide range of Azure services, not all services support them. It’s essential to check the documentation for specific services to confirm if they support system-managed identities.
  5. Limited to specific resource types: System-managed identities are available for certain resource types like virtual machines, Azure Functions, and App Services. They may not be available for other Azure resources or services.
  6. Limited control over lifecycle: With system-managed identities, the lifecycle management is handled automatically by Azure. This means you have limited control over aspects like renewal, revocation, or deletion of the identity.
  7. Limited visibility and management: System-managed identities are not visible or manageable through Azure Active Directory. They are managed within the context of the specific Azure resource to which they are assigned

Key Takeaways

  1. System Managed Identity for Azure SQL Database provides a secure and seamless authentication method for accessing resources within Azure.
  2. Understanding the benefits of System Managed Identity, such as simplified authentication and secure access, can help you leverage its full potential.
  3. Be aware of common permission-related exceptions that may arise when working with System Managed Identity, including missing login permissions at the SQL Server or database level, as well as DDL, reader, writer, or stored procedure execution permissions.
  4. By properly configuring and granting the necessary permissions to the managed identity, you can avoid these exceptions and ensure smooth operations.
  5. Practical examples, like connecting Azure Data Factory and Azure App Service using System Managed Identity, demonstrate the real-world application and value of this feature.
  6. Querying the roles assigned to the managed identity can help you verify the access levels and permissions associated with it within the Azure SQL Database.
  7. While system-managed identities offer convenient and secure authentication within Azure, it’s important to understand their limitations and consider whether they align with your specific requirements. For more advanced scenarios or greater control, user-assigned managed identities or service principals may be more suitable.

By keeping these key takeaways in mind, you can harness the power of System Managed Identity in Azure SQL Database and enhance the security and efficiency of your Azure resources.

Exploring Cross-Database Queries with External Tables in Azure SQL Database – Elastic Query

Introduction

In Azure SQL Database, the ability to perform cross-database queries is essential for consolidating data and extracting insights from multiple databases. One powerful feature that enables this capability is the use of external tables. In this blog post, we will delve into the concept of external tables, demonstrate an example using the “Orders” and “Customers” tables residing in different databases, and provide step-by-step instructions to set up and execute a cross-database query.

Learn more about it from Microsoft document

What are External Tables?

External tables in Azure SQL Database allow you to define a table structure that references data residing outside the current database. It provides a seamless way to query and join data from disparate databases, allowing you to access and combine information across different database boundaries.

Example

Consider a scenario where you have two databases, “OrderDB” and “CustomerDB”. The “Orders” table resides in “OrderDB”, while the “Customers” table is located in “CustomerDB”. The CustomerDB is a master database for customer records. We want to retrieve information from both tables using a single query.

Add a database user; skip if you already have one

Run the following scripts to add the user to the master database. We will need this user for the cross-database query. When a new SQL Server is created in Azure, the master database is automatically set as the default database.

CREATE LOGIN ExternalTableTestUser WITH password='Password12345';

Create Database

In our example, we will work with two databases CustomerDb and OrderDb. You can create new databases using Azure Portal.

Database User and Permission

Add the database user to the CustomerDb. This user is required to access tables in CustomerDb.

CREATE USER CrossDatabaseUser FROM LOGIN CrossDatabaseUser;

EXEC sp_addrolemember 'db_datareader', 'CrossDatabaseUser';

Or you can give permission to a specific table.

GRANT SELECT ON [dbo].[TableName] TO CrossDatabaseUser;

Create Tables

Create the “Customers” Table in CustomerDb.

CREATE TABLE Customers
(
    CustomerId INT PRIMARY KEY,
    FirstName VARCHAR(50),
    LastName VARCHAR(50)
);

Insert Sample Data into the “Customers” Table

INSERT INTO Customers (CustomerId, FirstName, LastName)
VALUES
    (1, 'John', 'Doe'),
    (2, 'Jane', 'Smith'),
    (3, 'Michael', 'Johnson');

Create the “Orders” Table in OrderDb.

CREATE TABLE Orders
(
    OrderId INT PRIMARY KEY,
    CustomerId INT,
    ProductName VARCHAR(50),
    Quantity INT
);

Insert Sample Data into the “Orders” Table

INSERT INTO Orders (OrderId, CustomerId, ProductName, Quantity)
VALUES
    (1, 1, 'Product A', 5),
    (2, 1, 'Product B', 3),
    (3, 2, 'Product C', 2),
    (4, 3, 'Product D', 1);

Setting Up External Tables

To enable cross-database queries, we need to follow these steps:

Create a Master Key:

  • Connect to each database separately. Must perform this step in OrderDb and CustomerDb
  • Execute the following SQL command to create a master key:
CREATE MASTER KEY;

Create an External Data Source in OrderDb:

Execute the following SQL command to create an external data source that references CustomerDb:

CREATE EXTERNAL DATA SOURCE RemoteCustomerDb
WITH (
    TYPE = RDBMS,
    LOCATION = '<server-name>.database.windows.net', 
    DATABASE_NAME = 'CustomerDb',
    CREDENTIAL = ElasticQueryCredential
);

Replace <server-name> with the name of the server hosting CustomerDb.

Create an External Table in OrderDb

Execute the following SQL command to create an external table in OrderDb referencing the “Customers” table in CustomerDb.

CREATE EXTERNAL TABLE Customers
(
    CustomerId INT,
    FirstName VARCHAR(50),
    LastName VARCHAR(50),
    Address VARCHAR(500)
)
WITH
(
    DATA_SOURCE = RemoteCustomerDb,
    SCHEMA_NAME = 'dbo',
    OBJECT_NAME = 'Customers'
);

Executing the Cross-Database Query

Now that we have set up the external tables, we can perform a cross-database query to retrieve information from both tables:

SELECT C.CustomerId, C.FirstName, C.LastName, O.OrderId, O.ProductName, O.Quantity
FROM Customers AS C
JOIN Orders AS O ON C.CustomerId = O.CustomerId;

In this example query, we are joining the “Customers” table from CustomerDb with the “Orders” table from OrderDb, using the common column “CustomerId”. By executing this query, we can seamlessly access and combine data from both databases.

Conclusion

External tables provide a powerful mechanism for performing cross-database queries in Azure SQL Database. By referencing tables from other databases, you can consolidate and analyze data effectively, enabling better insights and decision-making. In this blog post, we explored the concept of external tables and demonstrated a practical example with the “Orders” and “Customers” tables residing in different databases. By following the provided steps, you can set up and execute your own cross-database queries using external tables in Azure SQL Database.

Success Story — Azure Solution Architect Certifications

When a person is not confident then the mind forces us to stay away from the thing. I got trapped in a similar mindset for Azure certification. I had been thinking of doing it for the last one or two years but was delayed for no reason. I started many times but did persist enough to go to the next level due to the vast nature of the cloud.

Last year, I pushed my mind to pursue this path. I started late Oct 2019 with Az-300 training from Edureka. It was weekend classes for 6 weeks. I learned a lot from that training but didn’t get the confidence to attempt for the exam though. During the training period, I was learning and trying Azure services. So, the whole thing lasted 3 months and In Feb 2020 I got my Azure Expert certificate.

Tips: Never rely on a single resource when preparing for the exam. I found different ways to achieve the same thing in Azure videos. That’s useful and improved my overall understanding of the topic.

Disclaimer: my personal website and other works I did before starting on this path.

This is how I started.

Az-303 and Az-304

Let’s talk about the exam format. The number of questions varies for each student. I got 45 questions in Az-300 and 61 questions in Az-301. You see the details at the beginning of the exam, don’t forget to read them.

Lab Questions:

Both exams had lab questions, Az-300 had on lab consist of 8 tasks that I had to perform on Azure portal. I got two labs in Az-301 and questions were on the resources that were already there. e.g. how to optimize the cost of the storage account.

They spin Azure environment where you need to perform the given tasks. You don’t need to wait for the resource deployment you can do another task. Since Azure captures all the activities so they can measure the result based on the activity logs.

Case Study:

I got one case study for each exam. There were about 6 questions on the case study.

I had captured notes of key findings and useful links in the document on Google drive to read them later or whenever I had difficulty recalling them. I would recommend keeping the notes for reference.

Exam Preparation

Instructor-Led Training:

As I mentioned earlier; it started with training. I would recommend finding an instructor-led online training so that you can ask questions. Sometimes, we get questions in our head that might seem stupid to an expert but those are legitimate to build up good knowledge. So, the training will help you to clear your understanding of the cloud and Azure.

Microsoft Documentation:

Microsoft has rich documentation and covers almost everything it offers through Azure. They have built consistencies in the document layout and structures. As you can see in the below VPN Gateway documentation. A single place to learn Azure VPN Gateway. It has links to other related topics.

Learn about Azure architecture from the Architecture Center. I found it very useful and learned most of the Azure architecture from this. They have created reference architecture for most of the services that help to understand the architecture.

Microsoft Learn:

In Microsoft Learn, you can find how-to training materials. They are useful I tried them whenever I need more clarity on a topic/service.

For example, Core Cloud Services — Azure data storage options

LinkedIn Learn and Udemy

I bought a couple of training on Udemy. However, most of them only touch the surface. So, I would highly recommend don’t rely on any Udemy training. You can use them for additional learning.

LinkedIn also has a similar level of training material.

You will keep hearing from the author that please do not rely only on this training because they know how much they have covered and what’s the level required to pass the exam.

I also bought practice tests on Udemy, but they have a very low level of difficulty level compared to the actual exam. So, use them to improve your knowledge, and don’t assume you will see similar questions in the exam.

If you are already familiar with Azure and its exams then you can skip the next section.

First time attempting Azure exam?

First, you need to decide where you want to start. If you don’t have any knowledge then start with Az-900. Azure has role-based certifications to evaluate different skill sets e.g. Security, Administration, DevOps, Development, Architect, IoT, Data. You can find more about other certifications here.

I hope this helps you to at least start on this if you have been thinking and delaying it…

You may like to check the sample questions.